s

SmellyBlog

Pumpkakes

IMG_2138

I received a beautiful chunk of pumpkin from my sister in law's garden (she lives next door and of course grows everything organic). It was enough to make 3 pumpkin pie filling, and then another excess of an extra half a cup. So I decided to freeze enough for making "only" 2 pumpkin pies. From the remaining pumpkin puree, I created this yummy breakfast pancakes today. Try to say "Pumpkin pancakes" and you'll quickly realize that's a pretty difficult thing to do. So I decided to just call them pumpkakes!

Mix well:
2 cups (about 600gr) cooked pumpkin puree
1/3 cup yoghurt, buttermilk or sour cream
1 Tbs Grapeseed oil (or other neutral vegetable oil)
2 eggs
3 heaping Tbs of coconut palm sugar (or brown sugar)
1 tsp Cinnamon, ground
1/2 tsp dried Ginger, ground
1/2 tsp Allspice
Pinch of nutmeg

Sift together:
1 cup whole grain spelt or wheat flour
1 tsp baking powder
Pinch of salt

Butter, ghee or oil for frying

Add flour mixture to the pumpkin mixture. Fry one table spoon pancakes on a hot and buttered girdle until the rims of the pancake are a bit dry, and only then flip (this is a pretty soft.

Serve with date molasses, maple syrup or honey and various orange fruits such as mango, persimmon or sliced oranges.

Guava Jam

Made another batch of #organic #guava #jam with my SIL yesterday.

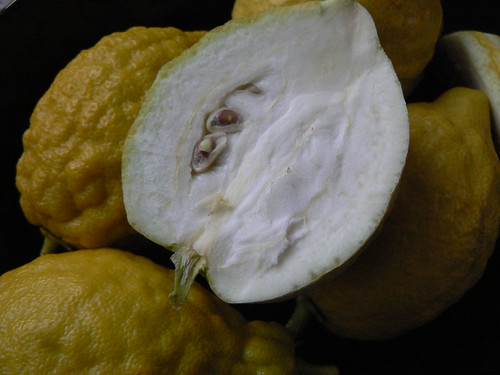
There are two types of people: Those who love guavas with passion, and those who can't even stand being in the same room with it. With its strong aroma, it may not be too surprising that it is related to myrtle. I've been having hard time finding innovative recipes for it. But they're out there, and also inside my head. Adding guava juice, pulp or nectar to smoothies is a no brainer (try it with coconut milk, banana and mango; but avoid orange juice as it will make it taste like orange toothpaste! I sweat!), chutney, fresh salsa (that is so easy that doesn't even require a recipe!), and inside a curry. 

Recipes I've been dreaming of are guava sorbet and/or gelato, guava creme brûlée, guava cheesecake, to name a few. Guava jam is our family tradition each fall, because no matter how much we eat it, there are always some fruit that don't get snatched in time and taste too mushy or stale and can only be salvaged if turned into jam. 

Like quince, it will become pink-orange with cooking. It's quite astounding how much fall fruit have in common: strong personalities, strong aromas, interesting textures. And just like quince, it is easily candied into a jelly-like confection (look for it in Mexican stores, sometimes it comes in a roll). 

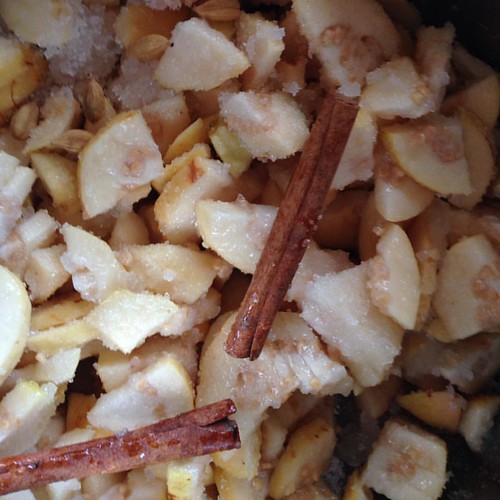
I like to make my jams on the less-sweet side, so ration of 1:2 sugar to fruit. i..e: One kilo of guavas to 500g of sugar. Squeeze some lemon juice over the fruit, add the sugar, and add a couple of cinnamon sticks and between 5-10 cardamom pods. Clove buds are also an option (I leave them out because they can overpower easily). Another seasoning direction which is entirely different is add a couple of small, dried chilli peppers to the jam. 
Cook over medium-high heat while stirring constantly, until the sugar dissolves completely. This could take about 10-15 minutes. Don't rush it by increasing the heat as to avoid any unnecessary scorching.  
Once the sugar is completely dissolved, reduce the heat to low and cook while stirring frequently with a spoon, until a spoon that is dipped into the jam is covered and remains covered. This would take about an hour. 
Sterilize your jars and fill them while the jam is still hot. Use a hot-bath method if you're really serious about your jamming and are planning to sell or give away or made a big batch. Mine usually gets eaten pretty much right away so I'm not the most diligent sterilizer beyond rinsing them with boiling water and filling and covering right away, turning the jar upside down to create a vacuum-like seal. Which gets popped up within less than a week and eaten in about as fast... 

Homemade #guava #jam

Traditional Honey Cake

Great Grandma's Honey Cake

When visiting my dad in Montreal I overheard him and a friend talk about his two wonderful family recipes for honey cake. Not having been raised with my father, and knowing very little about his side of the family - I couldn't pass on the opportunity to connect to my paternal ancenstors via culinary traditions. One of them was from a friend of my grandma and seems a bit too tricky to make. The other, which I'm sharing here, seems very authentic and has even more honey than my Savta Ruthie's recipe which I grew up on.

It is very moist, and having less spices (and no cloves at all - fathom that!) it has a definitive honey flavour, which is a good thing. Honey is a strong flavour when added to more delicate things; but can easily get lost in a recipe such as cakes and cookies. It has very little oil, and is immensely moist and with a long shelf life. It is wonderful accompaniment to either tea or coffee. And also makes a very big cake, that you can cut into squares and share with family and friends as a gift - simply wrap in a wax paper and tie with a bow.

The cake has a bit of an unusual mixing method, so pay attention to the instructions:

Preheat oven to 350F/180c

Mix together ("Honey")
3 eggs, beaten
1 cup suagr
3 Tbs vegetable oil 
1 lb honey, liquid (place in hot bath prior if it has already crystallized) 

Mix together ("Tea"):
1 cup dark tea, cooled + 1 tsp baking soda

Sift or mix dry ingredients:
3 cups flour
1/4 tsp salt
2 tsp baking powder
2 tsp allspice, ground
1/2 tsp cinnamon, ground

Additives:
1/2 cup nuts (such as pecans, walnuts or sliced/slivered almonds)
1/2 cup raising or dates, dusted with some flour first (if you don't do that they will sink to the bottom of the pan and burn or caramelize at best) 

Juice of 1 orange 

Alternately add the tea blend and the dry ingredients to the honey blend. Mix well. Add the nuts and dried fruit and the orange juice. 

Place in a a round spinrgform pan lined with a baking sheet (or in a large rectangle pan) and bake for about an hour or until a toothpick inserted into the cake comes out clean. Keeps well but if you don't think you can eat it within a week, keep it refrigerated. 

Raspberry Streusel Coffee Cake

Raspberries

Summer is here and the fruit is ripe - and gets overripe before there's time to completely enjoy it... So some has to become this cake, which is one of my favourite cakes ever... It's the second week in a row that I'm making it and we have no trouble finishing it up - and thankful whenever there is a guest over to help us out!

It's super simple to make, and the best part - it smells so beautiful when it bakes - nothing quite like pastries baking when they have loads of almonds, butter and vanilla in them!

Streusel:
100g Melted butter 
1/4 cup sugar
1 cup flour 

Prepare the streusel by mixing together the dry ingredients, then pouring the melted butter on top. If the mixture is too moist, add more flour until crumbs have formed. Refrigerate and proceed with making the cake

For the cake: 
10 Tbs. salted butter, room temperature
2/3 Cup sugar
1 tsp. pure vanilla extract or 1 tsp. vanilla paste
1 tsp. pure vanilla extract
Zest from 1 lemon
3 eggs
2 cup unbleached white flour
250-300g raspberries, fresh or frozen, tossed with 2 Tbs flour 
2 tsp. double acting baking powder, or 1 package baking powder 
1/4 cup buttermilk or sour milk 

• Use an 11 inch springform pan, lined with parchment paper.
• Cream the butter with the sugar, vanilla and almond extracts.
• Beat in eggs, one at a time.
• Sift the flour with the baking powder Beat into the egg mixture. Add the buttermilk and mix well.
• Toss in the dusted raspberries (flouring them first ensures that they won't sink to the bottom; if using frozen ones, let them thaw a little bit before adding the flour, so that it actually sticks to their outsides and covers them).
• Spread the batter into the baking pan.
• Bake at 350°F for 30-40 minutes, or until a knife or toothpick inserted in the middle comes out pretty clean (as long as you don’t insert it through the fruit!)
• While the cake is baking, prepare the Raspberry Sauce. 

For the raspberry sauce:
250g raspberries
160g powdered sugar
2 Tbs Créme de Cassis liquor 
Juice from 1 lemon (about 2Tbs)
Blitz in a food processor until smooth. Keep refrigerated.

To serve:
This raspberry torte is best served on the day of or the next day at the most (if it will last at all!). Serve it warm with a scoop of vanilla ice cream and drizzle the raspberry sauce all over it.
Or, serve at room temperature with a  dollop of whipped cream and drizzle with the raspberry sauce as well.

Raspberry Coffee Cake

Etrog Icebox Shortbread Cookies

Etrog (Citron)

Ingredients:
    125 g (1/2 cup AKA 1 stick) unsalted butter, room temperature
    1/2 cup confectioners' sugar
    1/2 teaspoon vanilla extract
    1/4 teaspoon salt
    1/2 cups all-purpose flour, plus as much as needed for rolling
    1/2 cups rice flour or tapioca starch 
    Zest from one etrog (citron), or Meyer lemon, or dried yuzu (Japanese citron). Or: mix in 1/4 cup of candied citron peel

Instructions: 
- Using your tool of choice (fork, wire whisk or an electric mixer) beat tougher the butter, sugar, vanilla, and salt until smooth.
- With mixer on low speed, add flour, mixing just until a dough forms. Stir in desired mix-ins.
- Divide dough in half; wrap with a plastic wrap and gently roll each into a 1 1/2-inch-diameter log. Place in the freezer for at least one hour (or store up to several months so that you can just slice and bake a few cookies on demand whenever unexpected company is coming)
- Preheat oven to 350 degrees.
- Unwrap logs, and using a French knife, slice dough 3/8 inch thick (if dough crumbles, leave at room temperature 5 to 10 minutes). Arrange slices, about 1 inch apart, on baking sheets.
- Bake until lightly golden around the edges, about 15 to 20 minutes.
- Cool on baking sheets 1 to 2 minutes; transfer to a wire rack to cool completely.


Back to the top